Hi, Could you please tell me what is the correct way to set-up for surface fishing with a controller float? A diagram would be great.
Many Thanks, Gary.
Hi Gary, thanks for the email. Surface fishing is a great way of getting amongst carp when they are in the upper layers, and I must confess, I’ve become somewhat addicted to the pastime over the last year or so! I’d always known how to rig up and put the method into effect, but my results had been far from impressive, so last year I really got to grips and refined my approach, which has seen me bank more off the top in the last twelve months than I have since I started fishing – including a number of fish through last winter, the best a 24lb mirror in November! As such, I’ll describe in detail my current set-up and how I got there, then give a few tips for putting the approach into practice.
There are loads of different ways to set up a controller, although all are based on the same principle; your main line through the eye on top of the controller, usually attached to a swivel, which then has your hooklink attached to the other end of the swivel. However, I found that this basic method was prone to tangles on the cast, whereby the thin hooklink would get wrapped around the controller or the mainline, the result being that you ended up having to wind in, untangle and try again.
It was whilst asking for input from others for my own set-up that the perfect solution was handed to me on a plate, and I can honestly say I have never looked back and have not had *one* tangle on the cast since. The simple answer, which I must thank Matt Antal, manager at Fishing Republic in Manchester for, is to include a Gizmo link in the set up. Not only does this eliminate tangles, but it also allows me to slip the controller off if stalking in the margins so I can free line, but also allows you to break down the kit or change controller size in a matter of seconds if you spot fish further out.
This is how I set-up for controller fishing;
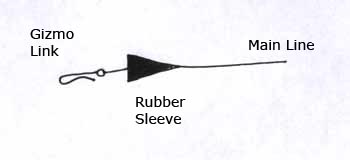
Main Line
Thread your main line through a tail rubber and tie to a gizmo link.

Hooklink
I use between four or five feet of WB Clarke Match Team 7.9lb 0.20mm diameter mono for most of my surface fishing, though if I’m fishing for large fish or fishing snaggy waters I will often use the same brand but in 10.1lb 0.22mm diameter size. At one end I attach the line to a mini-swivel using a Palomar knot (this is the best knot I’ve found for minimal slippage on thin mono’s). At the other end attach the line to the eye of the hook, again using a Palomar knot. I match the hook size to the size of fish I’m targeting, but have found that a size 14 or 16 FOX Series 2 Match Hook will cope with everything from the smallest to the largest, and it is by far my favourite hook for the job as they are tiny but very strong, so do not stand out under the dog biscuit.

Once you have attached the hook you need to attach a bait band to the back of the shank. To do this, hold the tip of the hook between your thumb and forefinger, so that the shank is upturned and facing you (1). Then slide the bait band under the shank so that half is visible either side of the shank (2), then, using a baiting needle, thread the needle under and up through one half of the band, over the shank, and then hook the other half with the needle (3), and then pull it back through the first half (4). When pulled tight manoeuvre it so that you are left with a nice loop sitting tight off the back off the shank (5).

You can get bands with a little hole on the bottom, which you just prick your hook through and slide around to the back of the shank, but whilst they are easier to attach, I’ve found the bait sits too far under the hook and the fish spook – the tighter the hook to the bait the more confident the fish will be.
Set-Up
To assemble the set-up, first slide the hooklink swivel onto the gizmo, then slide on your chosen controller.

Then simply slide the rubber sleeve back over the gizmo clip and Job Done, a nice tidy set-up that won’t tangle.

Tips
I often grease the hooklink a little bit so that it always stays on the surface, I have a small tub of Vaseline and I just dab a finger in it, then rub down the line. You only really need to do this once a session.
That’s it really. All that’s left is to put a dog biscuit in the band and away you go. What I would do though is ensure when the biscuit is in place that the hook sits nicely underneath with the line coming up onto the surface – if the line comes down before it goes up the fish are much more likely to spook. Adjusting the bait band on the shank should sort this.

The choice of biscuit is also important. I believe that quality counts and wherever possible I use Pedigree Mixer biscuits, as I find them better shaped and easier to keep in the band on long casts then cheaper types. I also coat my mixers with a flavour, as I believe this gives them a boost over any others that might be out there. Having used most, I have stuck with Nash Supasense Oil Palatants. I tend to empty a whole bag of mixers into a carrier bag, pour about 20mm of flavour in, and then give the bag a proper shake to ensure it gets spread around all the biscuits. I’ve found the oil also helps calm the water if there is a bit of a rip on which helps visually.
Then it’s just a case of getting out there and going after them, just remember your Polarised Glasses, which will help you locate the fish much easier and soon you should be banking fish off the top.

Hope this helps.
Tight Lines…
Julian Grattidge
June 2006