{If you don’t visit our photography forum, then you may well have missed this little gem. Although Steve uses a rose to illustrate this article, it works superbly with fishing photographs. You can see the original discussion by clicking here – Ed}
This effect is a lot easier than it looks and I consider this to be for beginner/intermediate users. The photo of the Rose was taken in portrait mode and was not cropped side to side, but top to bottom to match. The photo was then resized to 600 pixels along the longest edge.
To get things nice and accurate your going to need to use your image size as a starting reference so first of all, from the top bar click on View/Rulers, this will open a ruler on the top and left of your photo. Now click on Image/Image Size and write down the size of your image (The Rose is 600px X 589px). At this size a frame border of around 50 px is about right so using the image size measurements and allowing for 50 pixels either side of your photo we go from 600 x 589 to 500 x 489.
If you now click on one of the rulers around your photo and drag onto the photo itself, you’ll pull a guideline onto it, do this top and left and position the guide by dragging at 50 pixels into the photo. Now click the rectangular selection tool and you’ll notice the toolbar change just under the main menu, on that toolbar you’ll see “Style” with a dropdown box next to it, click on this and change it to “Fixed Size”, a width and height panel will be next to it fill in the new image size we worked out above, for the Rose that’s 500 x 489.
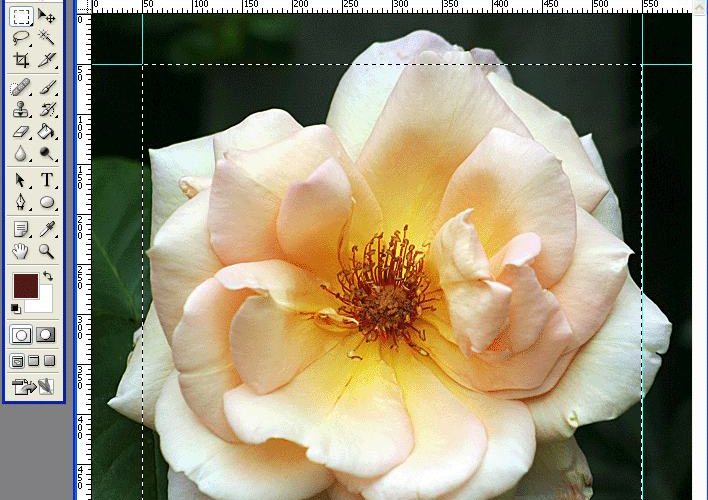
Now click on the photo and a selection will be made on it (known as marching ants) and by dragging align the left and top to the guidelines you already placed. You now have a selection that is central to your photo with 50 pixels all around it. Drag another guide from the ruler on the left to the right side of the selection, if you move it slowly you should see it snap into place, do the same from the top ruler and drag to the bottom of the selection. See the image below to reference what we have done so far.
This picture clearly shows the the cropped photo with rulers open, it also shows that the rectangular selection tool is selected for use with its style set at “Fixed Size” and the measurements added next to it. It also shows the two guides added at 50 pixels inside the photo at left and top and the selection box on the photo aligned with them.

Now we’ll add the inset line and frame and we’ll use white and black respectively. First of all set you colour pallete to black and white, to do this just hit the “D” key on your keyboard and foreground colour will be changed to black and background to white, you’ll see this on the toolbar and in the image below, now click the little arrow icon next to it and you’ll notice the colours swap so that white becomes your foreground colour.

From the top menu click on Layer/New/Layer and in the new dialog box that opens name it “inset line”. Now click from the main menu, Edit/Stroke and in the dialog box you should set it to the following.

Now click Layer/New/Layer and call this one “Frame” and then go to your black and white colour swatch again and change it so that black is your foreground colour. Then click Select/Inverse and then Edit/Fill and click okay on the dialog box that opens, you should now have a black frame on top of your photo.

Click on Select/Deselect.
Now we are going to work the magic that makes the photo pop out of the frame, read through this next part before you start it so you have an idea of what needs to be done. First we’ll set up everything.
Select the pen tool and make sure “paths” is selected on the toolbar (as indicated in the picture below)

Now we need to turn the frame layer off so we can see and work on the rose underneath it, to do this go to your layers pallette, and click on the “eye” icon next to the frame layer to turn it off, as below.

Now click once on the rose layer in the layers pallette to select it, and we can start working on it with the pen tool.
When your using the pen tool you will see there is a little “x” next to it, just bear this in mind for a minute.
Okay, we want to use the pen tool to draw around the part of the petal that overlaps from the main picture onto the frame area, we can see this even though we have temporarily turned the frame layer off because of the guides we set up earlier. Click a start point on one of the overlapping areas and by clicking the next point along the overlapping area we can start to draw around it, don’t drag your mouse, just single click then move your mouse cursor and click again, when you get almost all the way round this piece your final click should be on the point you started at and remember that little “x” I mentioned above? well you know you have the right point because that little “x” will now change to a little “o”, this lets you know you have completed what is known as a “closed path”. Make a closed path around all of the areas that overlap the frame area from the main picture and when you have that done (pauses for breath – nearly there now) right click one of the areas and click “Make Selection”, another dialog box will open. Set the feather radius to “0” and make sure anti-aliase is ticked (as below, and click “OK”.

You should now see “marching Ants” around all of the selected areas of the rose that overlap the frame area. You should also notice that I have come inside of the guide lines to make sure the bits of image that I copy and paste overlap the inset white line we made earlier.

Here comes the magic..
Click Edit/Copy then select the frame layer in the layer palette by clicking it once, click Edit/Paste then click the eye next to the frame layer to make it visible again. Then go to View/Clear Guides and you should have this..

I suggest that now you save this as a photoshop file (.psd file extension), then flatten the image (Layer/Flatten Image) and save as a .jpg file.
A little embellishment of my own to personalise it, and we have a finished image.

Out from the frame – using Paint Shop Pro X (v10) (No screenshots for this one!)
- 1. Open your photo, crop and resize to suit. Around 600 pixels is a good size to practice this technique with.
- Click on Image/Image Information, to determine the dimensions of the photo. The rose is 600 x 589 pixels.
- Click on the rectangle selection tool on the left toolbar, you’ll see the toolbar on the top change, on the right of the anti-alias checkbox their is an icon that when you hover your mouse cursor over it it says “Custom”, click on that.
- A dialog box will open: fill in 50 on both the “top” and “left” box and using the figures you got in point 2 above subtract 50 from both of them and fill in the “right” and “bottom” boxes. So the rose would be.
Left 50
Top 50
Right 550
Bottom 539
Now click ok. - Now click on Selections/Invert then Layers/New Raster Layer, then select the “flood fill tool” from the left toolbar, choose black as the colour and click on the frame area to fill it.
- Now click on selections/Invert then Selections/Modify/Contract, set it to one pixel and click okay. Now click
Selections/Invert again and Layer/New Raster Layer and fill the frame area with white this time. - Now go to your layers area on the right and click and hold on the white frame area and drag it below the black one.
- Click on Selections/Invert one more time and from the rulers area of your photo (if you cant see rulers around your photo, click View/Rulers) drag a guide to align with all four sides of the selection box. Then click Selections/Select None
- Back to the layers area and click the small eye next to the black frame to temporarily hide it from view. Also do the same with the white frame so that all you can see is the rose and your guides.
- Now select the Rose layer and go to the left toolbar and select the “Freehand Selection Tool” from the selection tool flyout. We are going to click around the parts of the rose petals that we want to overlap the frame area with this tool, the method is single click and release, move your mouse cursor along to the next point along the petal and single click and release again, do this all around the petal area until you get back to the position you started at, then you double click and release and a selection (marching ants) will surround the area you want. Now click Selections/Promote Selection to Layer. Use the same method for all of the pieces that you want to overlap the frame.
- Finally go back to your layers area to rearrange things, they should be ordered like this. The very bottom one should be the photograph, the next layer up should be the white frame and the next one up the black frame.
- There you have it, and out of the frame “special”
Steve