Hit ‘n’ Run
How long is a session? A session, in terms of length, means different things to different people, personally I’m not one to sit on the bank for days or even weeks on end. Nope, for me a session is somewhere between 12 to 16 hours, which is relatively short in comparison to most Carp sessions.
With the length of my session being so short, and mostly overnight, I have to use my time as efficiently and effectively as possible.
Locating the fish and then applying bait correctly is the key, how many times have you seen carp anglers plonk themselves in the ‘Carp Park Swim’ and bait up heavily for the duration? Why?!
I’ve fished what I call Hit ‘n’ Run sessions very successfully over the last 5 to 6 years, and in terms of poundage of specimen Carp per hour of fishing, I’ve done very well indeed. All it takes is a little more thought and effort.
The set up and methodology that I use has been fine tuned and honed over the years to what it is now. I can feature find, ‘Spod’ and then get my hookbait on exactly the same spot accurately using only the one and same rod. How do I do it? Read on.
Location
As with any length of session the location of the fish is a very important; most would agree that location is more important than bait and rigs combined, so finding or knowing where the fish are feeding is paramount.
As I’ve already said, with Hit ‘n’ Run sessions you can’t really afford to pile the bait into any swim, sit back in hope that a fish or two may come across it. You’ve got to get the right bait, and the right amount of bait, onto the right spot to make the best of the time you’ve got.
Locating Carp is an article in itself and a topic that I haven’t got the space for in this article, perhaps one for the future.
Bait Application
Once the Carp have been located, or at least a very likely feeding spot has been found, the next job is to present your hookbait in a way the will entice a pick up. The right bait application will differ from water to water, and then from month to month, ranging from a single hookbait fished on it’s own to a double hookbait fished over a very large bed of particles and freebies.
It’s up to you to find the right approach for your water, whether through trial and error, observations, word of mouth or usually a bit of all three. Generally though, there are two approaches to a short overnight session, one would be to use a P.V.A. bag and the other would be to fish over a light scattering of particles.
The use of P.V.A. bags has been well documented and also seems to be the most favoured method on short sessions. However, I prefer to use a light scattering of particles with my hookbait and freebies fished on top.
Rod Positioning
How many of you put any thought into the positioning of your rods? I don’t mean away from a muddy part of your swim, I mean in terms of bite indication. I’m continually surprised with how little thought some anglers put into the positioning of their rods, I suppose if they look good then they must be good.
Personally, I position my rods that I’m using on single banks sticks and pointing directly towards the spot where I’m going to fish. With the rods pointing directly towards the feeding area the bite indication is greatly improved. This is because the only resistance on the line is the weight of the ‘Bobbin’, the line passing through the rod rings and the line passing over the bite alarm.
If you fish with your rod pointing away from the feeding area you will get a very slight bend in your rod, like a Quiver Tip. That’s ok if you are watching the rod tip and able to strike as and when the rods tip indicates a bite. You’ll be surprised how much movement there will be in a rod tip before your bite alarm will sound!
Rigs
Everyone has a personal preference to the type of rig and presentation that they use, but for most of my fishing I use the good old tangle resistant Helicopter Rig.
I have so much confidence in the Helicopter Rig, which I have adapted for my own style of use.
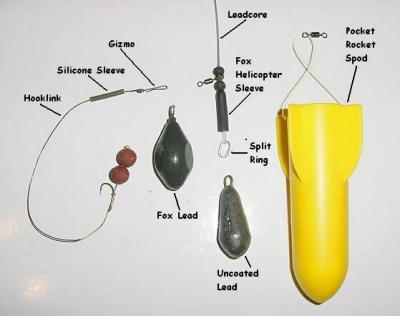
The Components

The way that I have adapted the Helicopter Rig I can easily remove the hooklink and lead at any time to replace them with other types of leads or even a Spod as I’ll go on to explain.
‘Leading About’
First of all I’ll break down my rig and attach an uncoated lead to do some ‘Leading about’.
A standard Pendant lead with the coating removed
The technique of ‘Leading about’ is very similar to using a Marker Float set up, but without a float and only reliant on the ‘feel’ from the uncoated lead. An uncoated lead will have more feel to it than a coated lead, which tends to dampen the feel.
‘Leading about’ is the best way to feel for lakebed features, but it does help if you already know the lakebed in the area where you are fishing.
The only draw back to ‘Leading about’ is that without a ‘running’ line to a float (as does a Marker Float set up) the depth of water cannot be measured.
I’ll cast my uncoated lead roughly past my chosen feature, like a gravel bar for example, and then pull the lead back towards me feeling the lakebed as I do so. Feeling the lakebed for features is far easier using a braided mainline like ‘PowerPro’ that I use as mono mainline suppresses the vibrations from the uncoated lead being dragged along the lakebed.
If I’m not 100% happy with my positioning or I feel that I have missed my chosen feature. I&rsquo
;ll then recast and try again. I’d rather have ten attempts of getting it in the right spot than just leave it where I’m not confident of a pickup.
Once I’m happy that my uncoated lead is positioned on the right spot I will clip the mainline into the line-clip and make a mental note of a feature on the opposite bank like a tree, bush or even a feature on the horizon like a pylon or church spire.
The feature that I have made a mental note of becomes what I refer to as a reference point. This reference point is my directional target to which I will aim all of my casts and my line clip will control the length of my cast.
‘Spodding’
With my mainline still clipped in the line clip I then remove the uncoated lead and attach my small Gardner ‘Pocket Rocket’ Spod via a split clip.
The ‘Pocket Rocket’, I never leave home without it!
There are many different sizes and variation of Spods, but I’m only putting out a scattering of particles using my normal rods and not a ‘beefed up’ Spod rod. The ‘Pocket Rocket’ is ideal for my situation and most rods above 2 1/2lb test curve should handle a full ‘Pocket Rocket’.
The particle that I use a lot is Hemp, which I correctly prepare before its use. The Spod is filled with hemp, boily crumb and a couple of whole boilies before being cast to my chosen spot. I’ll repeatedly cast my Spod using my directional reference point and the line clip until I’m satisfied that I have deposited the right amount of particle, usually 6 to 10 casts.
Baiting Up
Once I’ve finished Spodding I then remove my Spod before attaching my Fox lead using the split ring and baited hooklink using a ‘Gizmo’.
Neat, Tidy and Tangle Free!
With the line still in the line-clip I cast to my chosen spot as before, again, by using my directional reference point and the line-clip to stop the lead and baited hooklink, thus dropping it right on top of the light scattering of particle, boily crumb and freebies.
Marking the Mainline
Once settled the mainline is immediately removed from the line-clip and the mainline is marked using a line marker like the Fox ‘Marker Braid’ or even Tippex as some anglers use. I usually align the marker with the joint in my rods.
I will use this marker if I’ve caught a fish or for what ever reason that I’ve had to reel in without having time to clip the mainline into the line-clip first. I can do this by casting out further than my chosen spot; I then reel in until my line marker is aligned with the joint in my rods before clipping the line into the line-clip. I then reel in and cast out towards my directional reference point, again, allowing the line-clip to stop the lead and baited hooklink on the right spot.
Other Benefits
At any time I can clip the line into the line-clip and reel in, put on a fresh hookbait or even remove the lead and hooklink before attaching the Spod and topping up the bed of particles.
Using a little thought alternative rigs with removable leads can also be broken down and used in the same manner as I’ve used my Helicopter Rig.
This may read as a complicated and longwinded way of applying particles to your swim, but it’s far easier in practice and necessary if you want an accurate baiting situation at any distance.
As a final point, this process can be used if Seagulls are a problem. Those who have already encountered Seagulls catching their baits in the air will have to use this type of approach to get any freebies out accurately to their chosen spot.
Tight lines,
Garth ‘Gaffer’ Barnard