Right, I could sit here and type all night on the subject of river piking and still only graze the surface! So I will try to keep it to the things that I have found to work and be quite standard from river to river.
LOCATION
As with all fishing, the be all and end all to a successful day. With predators, the easy answer to locating them is to first locate the prey fish! Simple as that. An excellent way to do this, with minimum effort and without a massive experience of watercraft, is to look at the match results. These often give the winning areas/peg numbers and where the prey fish are caught in numbers is normally where you will find them, with the predators not far behind. Sounds simplistic, but believe me it works.
TACTICS
Another good aid to location, if you are having trouble locating the food fish, is to adopt a mobile approach. The following two methods/tactics are superb for this;
1. Deadbait wobbling.
Very simple method which uses a minimum of specialist equipment and covers a lot of ground.
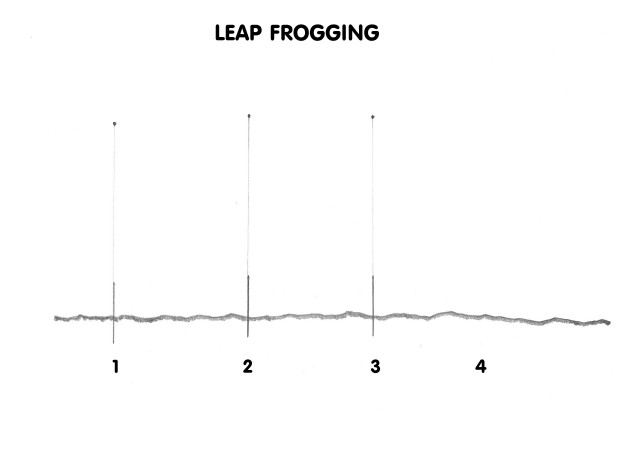
2.Leapfrogging
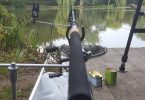
Uses multiple rods rigged with various different rigs/baits of your choice. For example, let’s say you choose to use three rods. The rods are placed a short distance apart (this depends on the bank side, as you will always want to be able to see each of your rods and be in control of them). After a period of time (15-20 mins is good), retrieve your first rod, walk it down past the third rod and recast it. Repeat this again after the 15-20 mins with the rod that was initially the second one but has now become the first, if you see what I mean!!! You can cover vast distances of river in a day doing this. When you find some fish, obviously give it a bit longer, but even more importantly make a mental note of the area for future visits. Unless you know the venue and its moods well, sitting still all day in one spot will seriously limit your chances of good sport!
BASIC TACKLE – RODS
For general bait fishing for pike, I would recommend a rod of 11′-12′. A test curve from 21/2lb to 3lb is okay for a river. Purpose made pike rods tend to have a more through/compound taper than carp rods and this is to stop them “casting off”soft dead or live baits. In the test curves mentioned, carp rods are often of a lot faster taper. These powerful rods are needed more for the rigours of casting heavy baits and setting the hooks than for playing the pike. For zander, many scale down the rods to 2lb, but this again is really dictated by bait size and the distance fished.
REELS
Any good quality medium sized fixed spool reel will do. I personally use Shimano 6010’s, even though I don’t use the “bait runner” facility for predators much, preferring open spool tactics. Nothing wrong with the good old Mitchell 300’s if you still have them, or any other reel of a similar size.
LINES
A lot of pikers have switched to braid, its qualities being very useful to them. I will not go into this here, as this in itself is a big big subject, but suffice to say, if you wish to use braid (I have done for years and love the stuff) don’t buy it by breaking strain, but select it by diameter. You should be looking for a diameter of around 0.35mm, regardless of the breaking strain stated. For those who still want to use mono, then 15lbs is the standard size. This may sound a bit heavy for a fish that isn’t the worlds greatest fighter, but it is used to provide a safety margin. Piking is a tough mistress on tackle and line and the last thing any responsible angler wants to do is leave a set of hooks in a fish through either the line breaking whilst playing a fish, or snapping off on the cast and leaving a set of hooks with bait mounted out there for a fish to pick up.
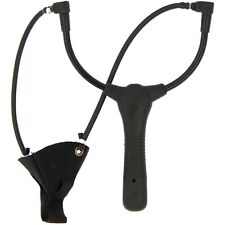
WIRE TRACES
As pike and zander have very sharp teeth, it is essential to use a wire trace. A minimum length of 18” is a good starting point, although more specialist rigs can call for different lengths. A breaking strain of a minimum of 20lbs is required.
HOOKS
Treble hooks are the order of the day here. Despite a lot of pikers having experimented with both single and double hooks, most (in fact all of the top pikers I know) have returned to trebles. What I will say though is choose semi barbless models. These have two points barbless and one barbed. In my opinion, this type aids both hooking and ease of unhooking the fish. The one barbed point is the one put into the bait and obviously helps keep it on! Sizes, like all fishing, are determined by the bait size. As an all round pike hook, I would recommend size 6 dropping down to 10-8’s for normal zander.
HOOK RIGS/TRACES
For 90% of all pike and zander fishing, you cant go far wrong with the standard snap tackle. Been around for a long time now and well proven. Below is a link to an article showing you how to make your own-
https://www.anglersnet.co.uk/rig-section/pike-rigs/how-to-make-pike-traces.html
Not only are home made traces cheaper, they give you the control over exactly how they are made and their dimensions, materials etc. It ain’t hard – give it a go.
RIGS
As I mentioned earlier a great way to find the pike is to use a method called “leap frogging”. Even though I tried to explain it, here is a simple diagram I knocked up to try and clarify it-

Position the rods as shown (you can obviously use any number you like, from two to four. Circumstances will dictate this.) After a period of time, move rod 1 down to position 4, then just keep repeating this gradually rolling along and covering lots of water.
I am a great believer in using both dead and livebaits at any one time. In the situation shown in the diagram, I would use two lives and one dead, unless experience of the particular water had shown otherwise. I would stagger these i.e. putting a live in position 1 and 3 a dead in 2. For presenting these baits I use the following rigs-

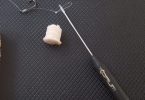
The Sunken Float Paternoster rig is one of the most effective ways of presenting a live bait that I know. The rig both keeps the bait in the desired position and keeps it working hard. This is a point that a lot of people don’t realise about live baits. Unless the rig is designed to work the bait i.e. keep it moving, the bait will just remain still and be nowhere near as effective. The sizes of polyball and lead shown are suitable for a 5″-6″ bait. For bigger baits, you will need to increase the size of both polyball and bomb. For faster currents, you will need to just increase the weight of the bomb. In fast water, I often substitute the round poly ball for a pencil shaped sunk float.
Bite detection with this rig is best done with a rear mounted drop arm indicator. This can be combined with a front mounted buzzer, or built in to a rear mounted “Backbiter” type alarm. For livebaits, I prefer the rear mounted type as you get less false “blips” caused by the bait moving. When tightening up to this rig to set the indicator, care should be taken not to tighten up too much. If you do, you will pull the rig over. It fishes much better upright. With a bit of practice, you will soon be able to feel this, as the polyball will pull the line/indicator away from you if it has been pulled over by over tightening.

Although the Sunk Paternorter rig is primarily a live bait rig, for some reason small whole coarse deads also work well on it. But for big coarse deads and half sea dead baits, then the rig I always use is the very simple but highly effective Free Running Leger Rig shown above. I have always found predators to be intolerant of resistance (or more accurately, I should say, “change of resistance”), so therefore always fish with an open bail arm (as opposed to a bait runner system) and try to make my rigs as resistance free as possible. The curtain ring in this rig aids this. The cork, or polyball, acts both as a stop and to keep the ring of the bottom and away from any weed etc. that could cause resistance. I say to use a 2oz bomb, minimum, as if you use any lighter you will find that it slides up the line on the cast! Bite indication, again, is by far best with the good old drop arm. The tighter you can get your line to the bait, the better your indication will be.
On the subject of indication, a lot of non pikers think that the common practice of fishing pike rods on single rests (as opposed to rod pods) and spreading them out to cover the water rather than just keeping them close together and casting the baits apart is a recipe for bad bite detection and subsequent deep hooking problems. Nothing could be further from the truth. The reason most pikers do this is to aid good bite detection. I will try to explain –

The three rods on the left of the diagram have been set up close together, “carp” style, whilst the three rods on the right have been spread out on single rests, “pike” style. Although the amount of water covered by the baits is the same in both cases, the bite detection is greatly improved by spreading the rods, as opposed to the baits, because there is less distance between the indicator and bait and everything is in a straight line. BUT, because you are not directly on top of your rods, you must ensure that you remain vigilant at all times and that not only can you hear your buzzers, but see your indicators as well. As regard to the distances apart, then a bit of common sense must be used. And remember, EA regulations say that the rod butts must all be within a certain distance (2m) of each other, however…….
The other method that is equally good at covering the water and finding the fish is Deadbait Wobbling. This requires only the one rod and is ideal for short sessions when you don’t want to cart a lot of tackle about. I like to use a specially made rod of 10′ long with a test curve of 2 1/2lb, combined with a small multiplier. However, your standard pike/carp rod and reel will work fine. The rig for this is simplicity in itself; just a standard snap tackle with a nice firm deadbait, like a roach mounted head up. You can add some weight to the trace mediately above the bait’s head, or even attached to the hook with a length of wire and inserted into the fish via the mouth, if you want. Sometimes, you will have to puncture the bait’s swim bladder to get it to sink, but the bait’s buoyancy, or should I say how you change/use this buoyancy, will obviously depend on your swim. In a very weedy one, it would be an advantage if the bait floated, whilst in a very deep one you would want to puncture the swim bladder and add weight to get the bait down. The bait is cast out and allowed to sink to the required depth. It is then slowly worked back towards you. You can actually stop retrieving, full stop, and let it sit still on the bottom for a few minutes if you like. It is quite common to get a take just as you start retrieving again. Vary the depth and speed of retrieve until you contact the fish. To cover a stretch of water effectively, try using the “Fan Casting” method shown below-

Start in position “A”. Cast to all the points shown in numerical order. Move to point “B”, repeat the casting sequence and so on.
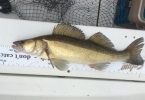
Well, I hope that helps a bit. When I next get some time, I will write a bit on some of the different baits used for river piking and how they are mounted on the hooks. I will leave you with this picture of a nicely marked fish taken from the Sussex Rother on a roach fished on a Sunken Float Paternoster Rig.
Budgie